Tuesday, June 19, 2012

Ruched side shirt

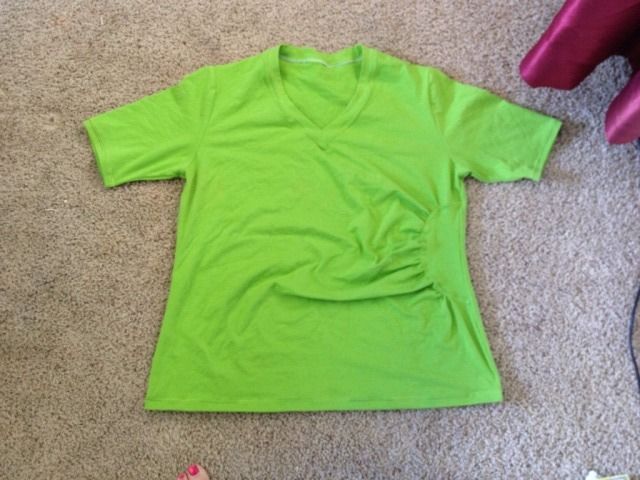
I had an idea for a shirt after looking around on Pinterest last night.  It was so cute.  It had a side cut out that was then gathered or ruched to the side of the cut out.  Here's how my pattern turned out.  Excuse the curtain and toe, I never promised to be a professional photographer.

Would you like to know how I altered the pattern?  Well for starters I picked one of my favorite basic tee shirt patterns.  This one happened to be Jalie 2805.  I love their patterns because I can make them from kid size to adult size all from the same pattern.  I used view C here only I lengthened the sleeve.  I like my sleeves to hit just above the elbow.

Trace your pattern off marking where you'd like the side cut out to be.
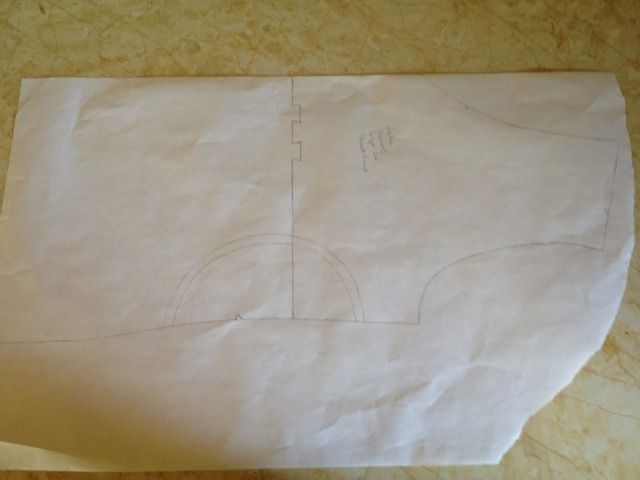

I didn't want to cut my base pattern (just in case I want a plain tee shirt later) so I retraced it on to two sheets of freezer paper taped together.  If you choose to cut your base pattern, you can just tape another sheet to the center front of the shirt so you have a full shirt front.  It's very important to have the full shirt front at this point.  Also add a seam allowance to the cut out at the side.  You need to draw diagonal lines into your front and carefully cut them from the cut out, to about 1/4" from the edge of the left side.
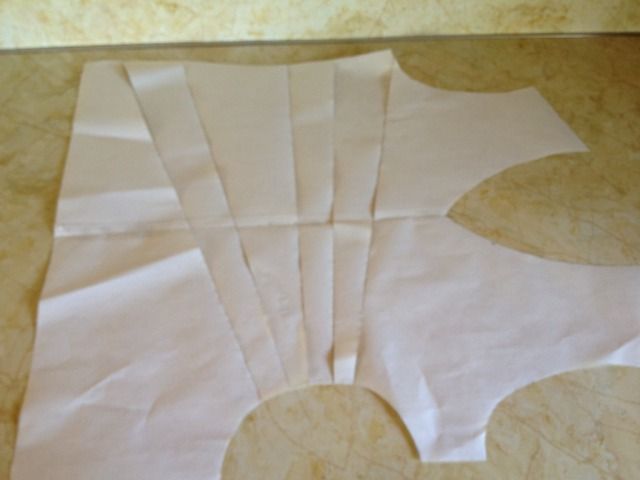


Next, decide how much ruching you would like for your shirt to have and carefully spread the slits apart.  Try to keep them even.
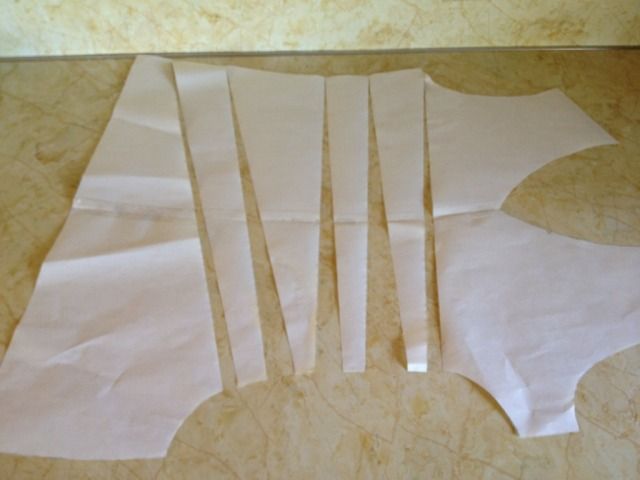

At this point you will need another two sheets of paper to retrace the top following the curve of the cut out.
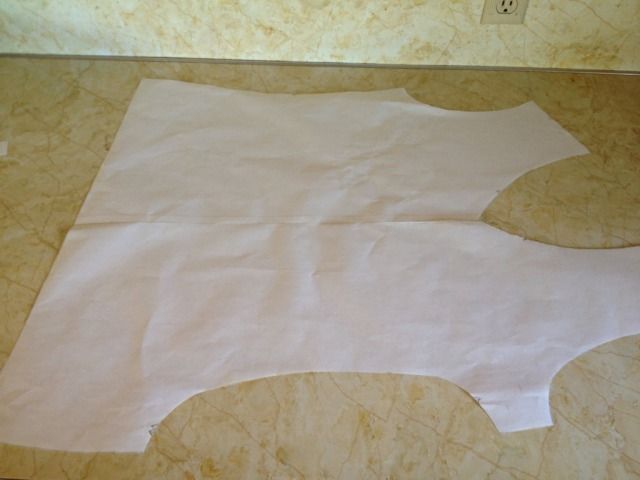
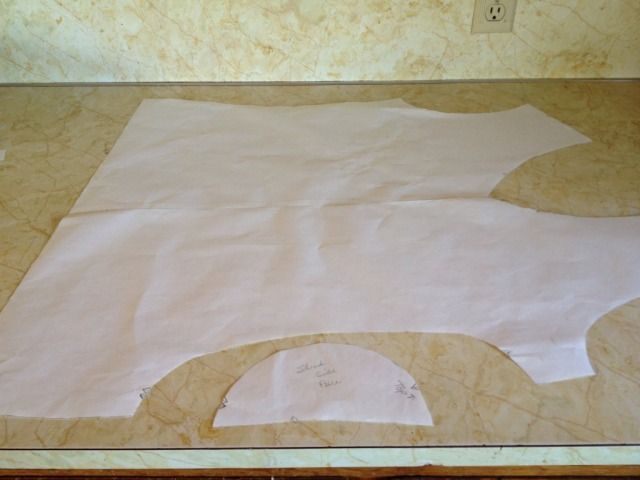

This is what your final pieces should look like.  I added notches at the top and bottom so that when I cut from my fabric there wouldn't be any confusion when I line the two pieces up to sew them together.  Don't forget to add seam allowance to each cut out edge.  The longer (bodice) piece is gathered to the smaller (side) piece when you sew your shirt together.


Questions?  Ask away.  :-)  Happy Sewing!

Saturday, May 19, 2012

To My Hannah

I'm laying here, the night before your 8th birthday wondering how the precious time moved so quickly. Tomorrow you will be baptized and confirmed a member of the church. I just can't believe that you grew so quickly.

We've had some highs and lows. You have always been such a sweetheart. I'm so glad the doctors were able to help you hear better. Thank goodness we had a doctor that finally listened to mommy. Sometimes mommies really do know what they are talking about.

You are such a princess. You always have been. I want you to know that we love you. I'm so excited for you as you take this next step in your life. Always remember to smile my sweet child.


- Love mom

Saturday, August 20, 2011

Drapey Jersey Shirt

I saw this tutorial the other day and new instantly that it would be a hit with Abby. She needed a shirt to go with a skirt that I made for her last week using my reconstructed denim skirt tutorial. The only thing I did differently is I serged the edges with a roll hem stretching as I sewed so that it would make it ruffle. We are both really pleased with the end product.

Thursday, August 11, 2011

Reconstructed Denim Skirt


Things you need: A pair of jeans that fit, sharp scissors, pins, heavy jeanstitch or topstitching thread, denim/jean needle, and of course a sewing machine.


First thing is to decide where you want to cut your pants off at. I decided I wanted mine cut off at the knee. I plan on adding a ruffle or something to the bottom.


Then split the inside seam of the leg.


Next, cut off the inside seam of the inner legs.


Split the back crotch up far enough so that when you lay the curve down it lays flat without any puckering.


Pin in place. It's best to stitch along the seam that's already there in a matching thread color.


If your pants have a deep crotch you may have to split some of the crotch seam in the front and lay it flat as well. Pin it in place and stitch like you did the back crotch seam.


Next take your leg pieces that you cut off and open one of the side seams.


Slide the leg under the open V where you split your leg seam on your garment. I turned my legs upside down since they were tapered. Pin it in place. (At this point if you do not want raw edges you can trace the shape on to your piece and add a seam allowance and then stitch your right sides together. Personally I like a little fraying so I just left it like this.)

Now take it to your machine and stitch along the edges of your fabric where it's pinned.


Once it's stitched you can trim off the excess fabric.


You can shape the bottom now. I wanted mine to come to a point in the middle and I also wanted it slightly longer in the back than the front. You could leave it just like this (though I would run a line of stitching about 1/2" away from the raw edge to keep it from fraying too far) or you can add a ruffle or something. I'm still trying to decide what I want along the edge of mine so I'll post a final pic when it's complete.

ETA: finished pic!


Blah Jeans, cute fabric = Super cute skirt


The thing about having children with long legs and skinny waists is they grow out of their pants in length before they grow out of the waist. What a waste to throw those away right? Well, tonight after doing my ruffle tutorial and saying something about how cute it would be on a denim skirt, I just had to try it. Cue Hannah's drawers... Found a pair that were too short but we are still cinching the waist with the built in elastic and buttons (man I love pants like that!)

This print is from the Heather Ross Lightening Bugs and other Mysterious things. It's out of print now which is sad. I've never loved a fabric collection quite like that one.

I chopped the pants off at the knee and split the legs. I also had to split up the back of the butt and stitch it down to make it lay flat. I took what was left of the leg, cut it open and attached it to the v left from cutting the pants open. Attached a ruffle and now she has a cute skirt. And of course who would I be if I didn't make her a matching headband and flower to go with it. :)


Hopefully tomorrow we can get an action shot. She's going to flip when she sees this tomorrow.

I think it's safe to say she loves it.

Wednesday, August 10, 2011

Gathering

It's one of my most hated tasks ever. I shy away from garments with ruffles/gathers because I simply can't stand sewing them. I have a ruffler foot for my machine but can't stand it even more then I can't stand gathering. I put together a quick little tute for a friend (and my mom, Hi mom!) so that it's easier to understand a method that I found works great for getting your gathers spaced a little more evenly and keep them from getting caught in the seam like mine use to.

Lengthen your stitch to the longest length and set your tension to 0 (it's very important to make sure you set your tension to 0 otherwise you won't be able to pull the bobbin thread). Stitch two parallel lines down the length of your gather/ruffle being sure your seam allowance falls between the two sets of stitches.

Pull your bobbin thread up gathering your fabric as tightly as you need it.

Pin, pin, pin. Those that know me know how much I hate using pins but they are a necessary evil when gathering. I also wrap my bobbin threads around the pins on the end to keep it from unraveling and losing the tension in my gathers.


Stitch using your seam allowance and then remove your bobbin threads and the top thread will come right off. Also, when I stitch any ruffles/gathers I stitch it so that the flat side of the fabric is on top by the pressure foot and the gathers are next to the feed dogs.

And voila!


Now, there's a second type of ruffle... One that sits on top of your garment and has a cute perky ruffle at the top and a longer ruffle on the bottom. It looks really cute on the bottom of skirts.

First step is to finish all of your raw edges. Either turn and topstitch, roll hem, or serge. Then run double basting stitches at least 3/4" apart.

Then, gather it to fit your fabric or garment.

Make sure the edge of the fabric/garment you are attaching it to is finished as well.


Pin it to the fabric making sure that your basting stitches line up along the bottom edge of your fabric/garment.

Stitch two parallel lines making sure they fall between your basting stitches. Pull your basting stitches and and here's how it should look when it's done.

The biggest thing is to make sure that your seam allowance falls between your basting stitches. That's what will give you the nice even ruffles. I hope this is helpful for someone.


Monday, April 25, 2011

Cabin Fever!

It's been such a cold winter. We didn't see much of the white stuff. I'm ok with cold if there's a purpose. (IE: Where's the white stuff?) But now ya'll? It's spring. We've had lots of rain. Thankfully we had a nice beautiful day on Saturday and so we went and had an Easter Egg hunt with some friends. In true "me" style, I forgot to take pics of all the kids and their loot but I did catch a few of Jake since this was his real first experience with Easter egg hunting.


I did catch a little video of Jake running after the eggs and Will is in it briefly. He was excited as well. :)


I hope you all had a lovely Easter. I am so happy that spring is here! I can't wait until we can do visits to the park to play. The kids only have one more month of school left. I'm sure May will be full of adventures!

Thursday, April 21, 2011

My Poor Neglected Blog

There are times where I remember it. I didn't realize that it had been so long since I'd posted though. :-/ The kids are doing great.

Jake is growing by the day. He's no longer nursing, and I was ready to be done. I love when he wants to just snuggle me.

Will is one of the most kind hearted kids I've ever had. He requires lots of mommy and daddy snuggles which we are more than happy to provide.

Hannah is so smart. She got E's on all of her grades except for music (weird). E stands for Exceeds Expectations. She loves to read which is always encouraged.

Michael, well, I think he's found something that he loves and really cares about! He's on the "track" team at school and loves it. He also attends an after school program where they do homework and spend time reading and doing other activities. He's improved on his grades quite a bit since 1st grade. I'm hoping that track gives him more ability to focus on his school work a little more.

Abby, she's 13 now. So hard to believe that I'm a mother of a teenager! I love that girl with all of my heart. I know she has the ability to be someone who can really make a difference. She just needs to embrace it.

As for me and Cliff, well we are busy parents of five of the most beautiful children on the earth. Cliff also accepted more hours and is now working full time. Sometimes the job is a little stressful but I think that's pretty typical. We also Independent Product Consultants for a company called doTERRA. Their products have made such an impact on our lives. We have such a wonderful group of people helping us to achieve our dreams and look forward to growing so much more.

♥ I hope that you all are doing well.

Sunday, August 22, 2010

Settling in

I think it's safe to say we are settled in to our new home. The kids started school back this past Wednesday and we are settling back in to a school "bed time" schedule.

Work picked up for me this past week and for the most part I think I did fairly well. :) I didn't exactly keep up with the house very well but my kids and honey were mostly cooperative in helping me reclaim it over the weekend. I just finished sorting Mount Washmore and realized I haven't done laundry for a week! Umm... Yeah 7 people really make a lot of laundry in a week! But no worries, I'll have it all caught back up by tomorrow night!

We are meeting new people in the complex and are loving our new ward (church). Everyone has been very welcoming.

Still trying to make things fit in the new house. It's a little bit of a challenge but I'm learning what I need and what I really don't.

Til next time!

Wednesday, July 28, 2010

Changes... How many can one take?

The baby, he changes daily. He learns something new like nodding his head in answer to a question or climbing up and down the stairs. In just one more month he will be a year old. Gosh that went fast.

Changing to a new job for my loving husband. It has a learning curve. Don't they always? Sure he's done maintenance before, but each supervisor has their own way of handling things. The only way to find that out is to learn them. This change also brought on a change of scenery. A change of space for my family. We have to live on site in a "town home" of sorts. It's smaller. I like to think of it as more cozy. yeah.... cozy... It's in an apartment complex so we share a wall. That's interesting. I've only ever shared a wall with another family one other time. Changing schools for the kids. Abby had a uniform last year but won't this year. I hope the schools are decent. A change of Wards. This was very hard for me. It's the first time in a long time I've felt like I belonged. Not that one really needs to "belong" but it does make you feel special.

Change from childhood to young womanhood. Abby turned 12 this year. She is no longer in Primary. She's old enough now that she's moved on to Young Womens. I have very fond memories of the Young Womens program. She got to go to camp and bond with the girls in our old ward which made it hard for her to leave too. I can't believe that my little girl is growing up.

I also got to attend the Temple this month. And as every faithful LDS member knows it also brings about some changes as well. I loved it though. The temple is so beautiful and peaceful. I could go and just sit there all.day.long.

It has been a busy many months and has brought lots of changes. The dictionary has this to say about the word change: To cause to be different. I think it's safe to say that change can be good, and it can also be hard. I think we've experienced a little of it all.

Change. That's all for a while please. I don't want any more change.

Sunday, May 02, 2010

Blogging gone mobile... uh oh...

Wednesday, April 28, 2010

Finished SweetPod!


jakefrontcarry
Originally uploaded by fastknita
I've only had the pattern since December when Jessica released it. :-/ I love it so much! It's very comfortable and ridiculously easy to flip him onto my back with out taking him out of the carrier. I was able to switch him from my front to my back IN COSTCO while talking to another mom about how cool my carrier was. She stopped me to ask what kind of "model" it was and explained that they were flying in the next week and it looked mighty handy. She was really surprised when I told her that I made it. :-D Thank you so much for a well built, extremely useful pattern Jessica!

jakebackcarry
jakesleephood

Bloggity, Crafty Sort of Mood

It seems, at least, that it's the way I've been. Maybe it's because I'm pretty sure my husband is tired of listening to me. Today some of my friends and I had a sewing craft day planned. Well those plans were foiled for me because of sick children. However I just crafted from home. I got my fabric for my carrier that I've been wanting to make since December in the mail this afternoon so I quickly washed it then set to using it. :) I'm not going to spoil it by posting pictures just yet. Be sure to check in later for some action pics.

Sunday, April 25, 2010

A Crafting We Will Go!

My latest obsession is Waldorf Dolls. Mostly because I love the way they look but they are crazy expensive. I have a little girl that loves to mommy every thing. She would love a doll like this. My pocket book said: "No way can you afford one!" so off I set researching for the things that I liked about them and how I could make one.

Well she still needs hair and facial features but I'm pretty pleased with the way she came out. :) She has a perfect fitting dolly diaper too. I have plans to make her a few more so that she has a "stash" of them for her little baby. I also plan to make her a carrier of some sort so that she can carry her new baby every where, and some clothes.

Daddy is getting involved too. Tonight I mentioned to him that I really thought this little baby could use a cradle so that she could be tucked in for naps. I could be wrong but I *think* I saw a spark in his eyes.


Stay tuned! This is going to be one heck of a birthday gift!

Saturday, March 27, 2010

Easter Already?

How'd that happen? Oh geeze, I swear the older I get the quicker life seems to move. :-/ Oh well... So Easter is almost upon us and I'm trying to figure out what to do for Easter baskets for my kids. Normally I make them some sort of bag. This year mom may be copping out. I considered making them some Capri Sun Bags but we would have to suck down about three cases today before lunch so that I could make them for our ward's Easter Egg hunt. For some reason or another I don't think THAT is going to happen. Well crafty mom may just have to pull out last years bags. Hmm... wonder where they are...

Sunday, January 10, 2010

Goodbye Christmas...

Hello New Year! It's been a pretty good start so far. Kids back in school, hubby back at work. What a year we had! Baby, birthdays, holidays. Lots of good memories! One of my resolutions is to be more on top of making posts here. Sure life gets in the way sometimes but I need to make notes about our family. After all that is why I started this blog anyway. :)

Hope your holiday was wonderful! Many Blessings!

XO
~Jess

Monday, December 07, 2009

These are a few of my favorite things...

Sweet boy smiles:


Snuggling and knitting by the fire:


CHRISTmas Decorations:


And snow:


What a beautiful Birthday! I was born the best time of the year!

Friday, October 23, 2009

Life in the baby lane

I love him. I love being a mom. It's just hard to get much done sometimes. He's the sweetest little boy though. Currently he's sitting on my lap enjoying life, kicking his feet and waving his hands. It's really hard to believe that he's already almost 2 months! Where does the time go? They grow so very fast.

Thursday, September 10, 2009

Baby baby !

We welcomed Jacob into our family and home on Sunday August 30th at 12:25 PM. He came just MINUTES after arriving at the hospital! He was a healthy 10 lbs. 7 oz. and all of his brothers and sisters are so glad to have him and fawn over him. They often will ask to hold him and get disappointed when I tell them no that he's eating or sleeping. I promise he won't always eat or sleep... :)

It's been almost 2 weeks and for the most part I feel like I've healed really well. We didn't have any pain medication during the birth. For that matter I didn't even get an IV. There just wasn't time. I gave birth in my tee shirt instead of a gown! Unfortunately for my wonderful husband neither of us realized I was that close to giving birth and he didn't make it into the room until I was cutting Jake's cord. I think he was slightly disappointed to have missed it but he's totally loving snuggling Jake.

I found my camera this morning so hopefully I can get some updated pictures of him. For now here is the one we took of him in his car seat on the day we came home.